Why
First of all this Email Personalization and Automation strategy isn’t for everyone, I’m a bit of a techy, and so this suits me perfectly. If you’re like me and using several platforms and solutions for various tasks and outreach in your funnel, then you’ve probably learned to love Google Sheets as a great way to prep and review data between platforms.
For example I love using Expandi for automated linkedin sequences and tools like TexAu for more complex automation, both of these tools and many more have a common trait of outputting to a Google Sheet, either directly or via a CSV file.
Once your prospect data is in a Sheet it’s easy to see holistically, as well as quickly filter and cleanse.
The pain can then be having to then export the cleaned data to somewhere else, to send out emails, or other automations.
Recently I subscribed to a weekly data list of highly targeted companies to my ICP, that is emailed to me each week as a CSV. I wanted a way to quickly review, filter out and then drip out emails to them.
So I decided to automate directly from the Sheet, using Integromat. Note you could exchange Integromat with Zapier, Pabbly Connect, Integrately etc, my preference is Integromat based on price and UI.
Price
Price isn’t always the best attribute the shop on, but in startup/bootstrapping land every penny counts. Using Google Sheets is free, Gmail can be free, or a few bucks per month to up your send thresholds and brand the send domain.
Usually bolting on an email automation tool on top of your Gmail is at least $50 per month, per user, more if you want to extract the full 500 emails per day send rate.
With Integromat you pay per operation, so sending an email would be one operation, a basic account is $9 per month and you get 10,000 operations per month.
Integromat even has a free tier, which gives 1,000 operations per month, so if you’re just starting out, this can be a totally free solution to get your first email campaigns out and getting that important early traction.
As you start to scale out email outreach and add more email accounts to send out with, the cost starts to scale too, so having the lowest base cost per use will become more important.
Like mentioned above, price wasn’t my motivating factor for choosing this route, but it is a nice additional benefit 😉
Outcome
Following this guide you’re going to end up with two Integromat Scenarios. The first will constantly check your Google Sheet for updates, so when you add new rows of prospect data, it will automatically send out emails, and update the Sheet with the send date.
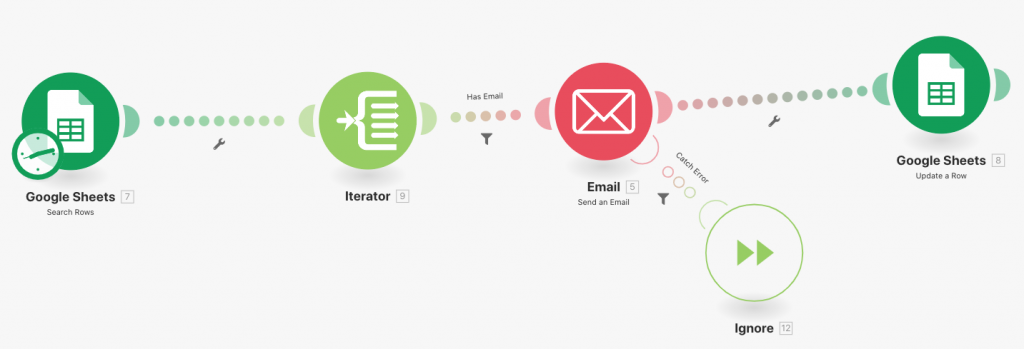
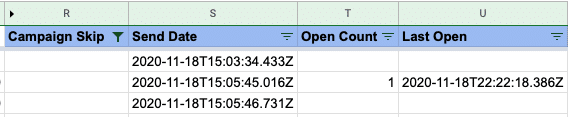
The second Integromat Scenario will check for email opens, by monitoring the personalised image impressions in the email, then update the Sheet with the number of opens and last open date.
Using this process we’ve had great success, first in perfect email deliverability, but also in terms of great campaign overview, and knowing when to follow up.
Were sending emails like this, with a personalised image that reinforces our call to action of jumping on a call. We help reduce the friction by minimising the ask to a “virtual coffee” and chat, rather than a sales call or demo…

Of course, this see’s some really engaged responses.
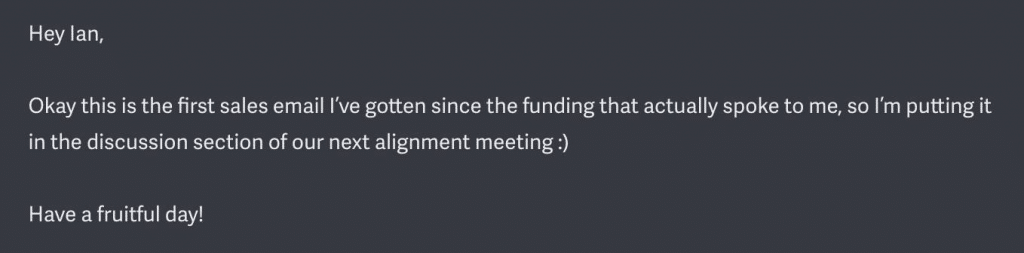
As well as creating delight, it results in actual sales bookings.

Lets jump into the six steps to get this done.
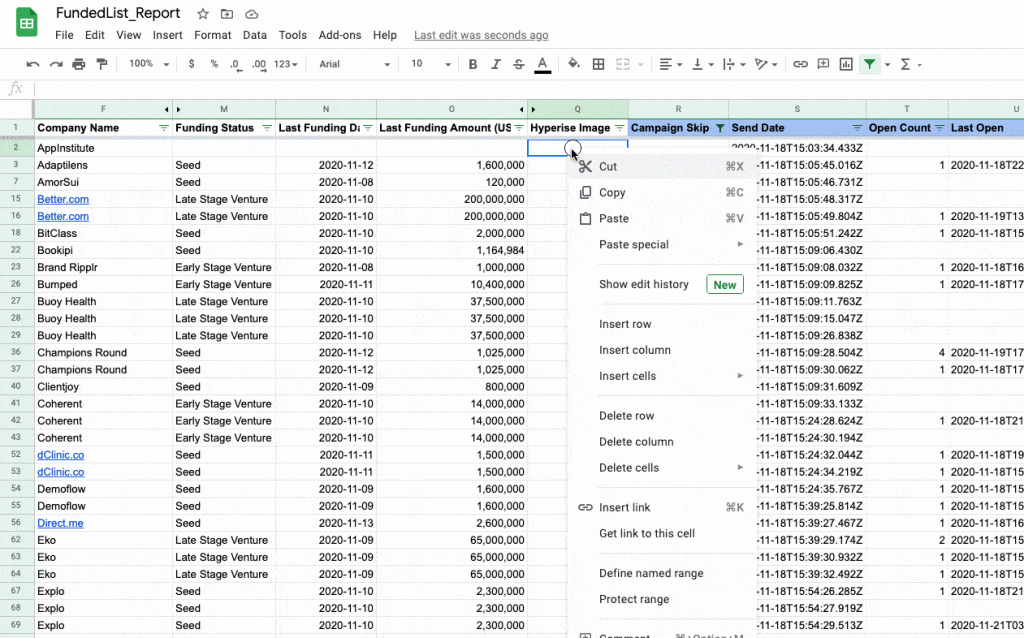
Step 1: Setup your Sheet
The first step is to have a Google Sheet full of prospect data, that we can reach out to.

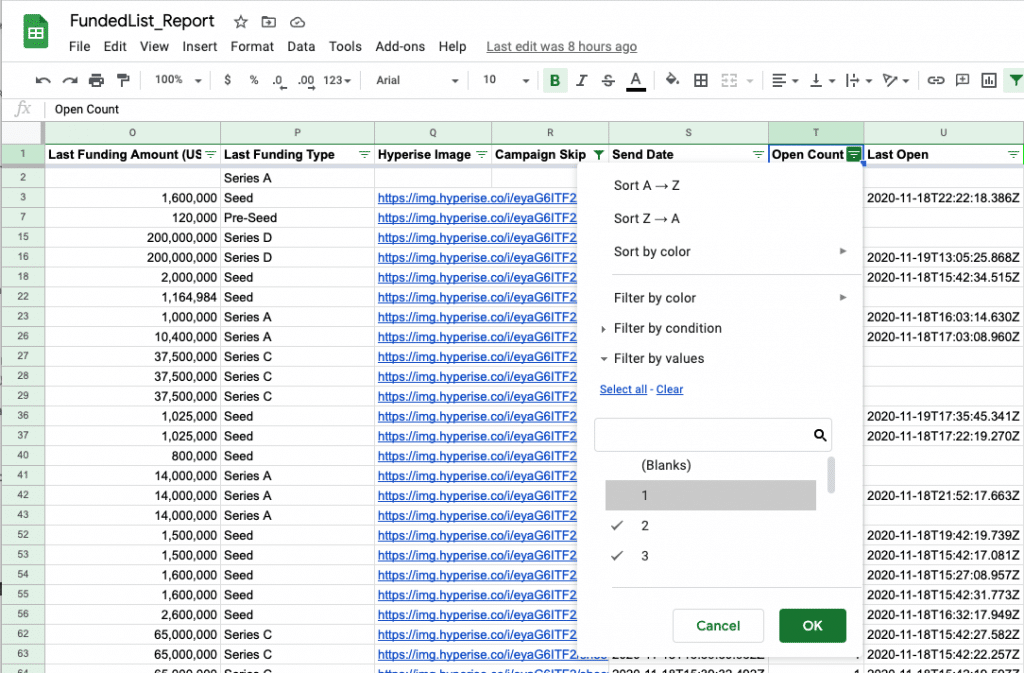
Then we need to add four columns to the end of the existing column data. These additional columns will be used to track when emails have been sent and opened, as well as being able to flag prospects to skip.
These four columns can be called what you like, but something along these lines will help you find them later.
Step 2: Connect Image the Sheet and Email
In addition to the tracking data columns, we’re also going to add a new column for the Hyperise image code, which we’re going to add to the email.
First we add the Google Sheet to the Hyperise image, if you’ve not done this before, check out this guide: https://support.hyperise.com/data-sources-and-lists/google-sheets-as-a-data-source
Once you’ve added the Sheet as an Integration, we can use the Hyper-campaign to get the code to add to the new Hyperise Image column.
We want the image to be clickable, so it will go to a personalised landing page, so we’re going to set up with that landing page in mind.

Once you’ve got the Sheet image code, you can add this to your Hyperise column, the code copied should be pasted to each prospects row.
This image column data can now be added to your emails like any personalisation tag such as first name, or other personal information you add to your email, in step 5 of this guide.
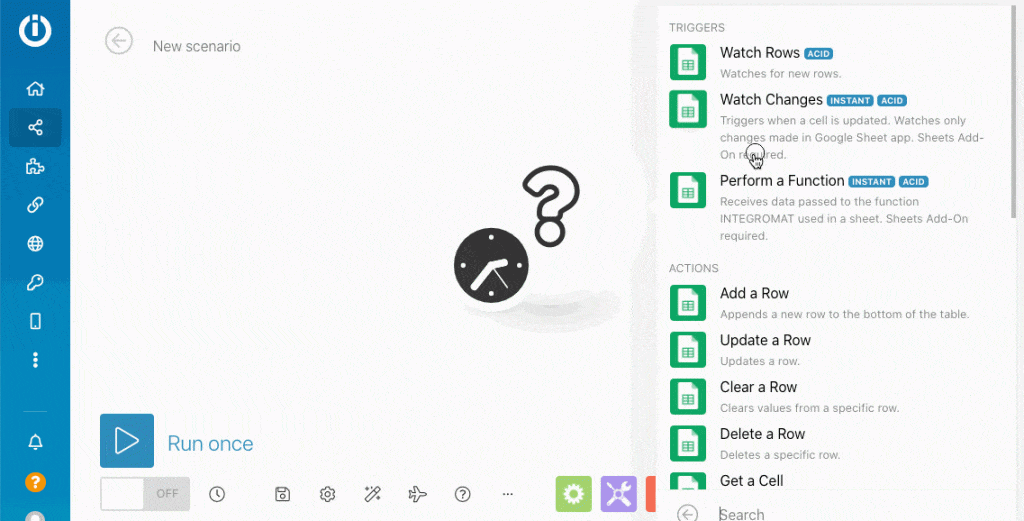
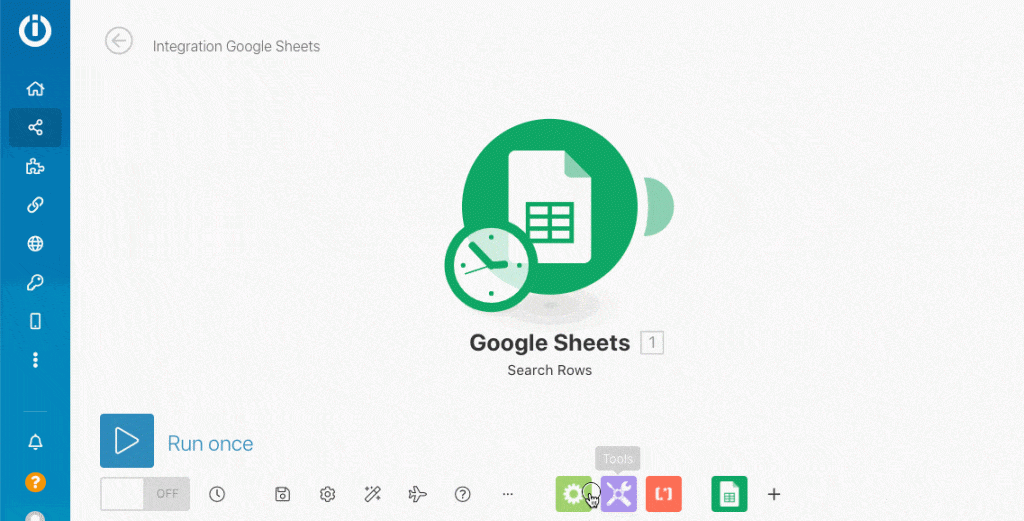
Step 3: Create Integromat Scenario
With Integromat, it’s visually pleasing and simple to create a Scenario, which is their name for an automation process.
If you don’t have an account, you can create a free account here: integromat.com
Once in, click the big blue button in top right of the screen.

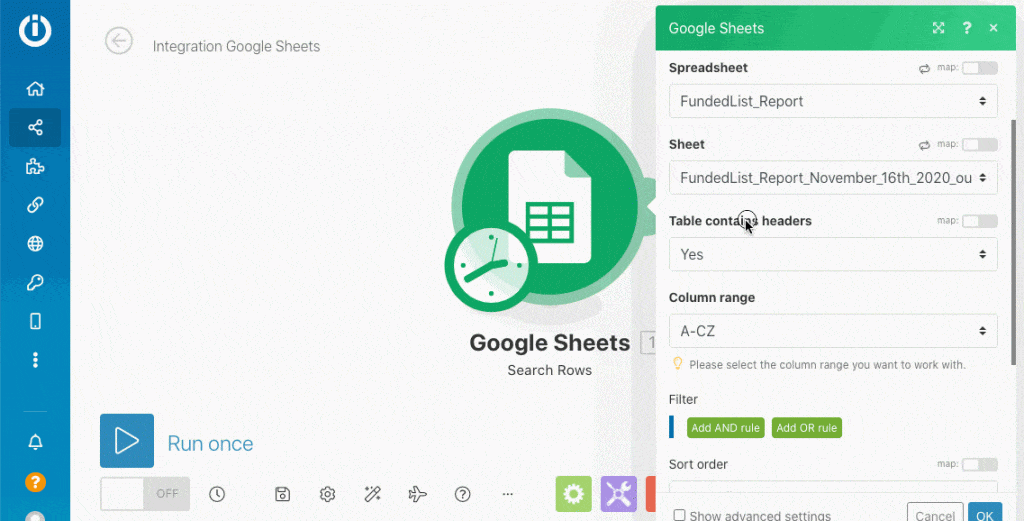
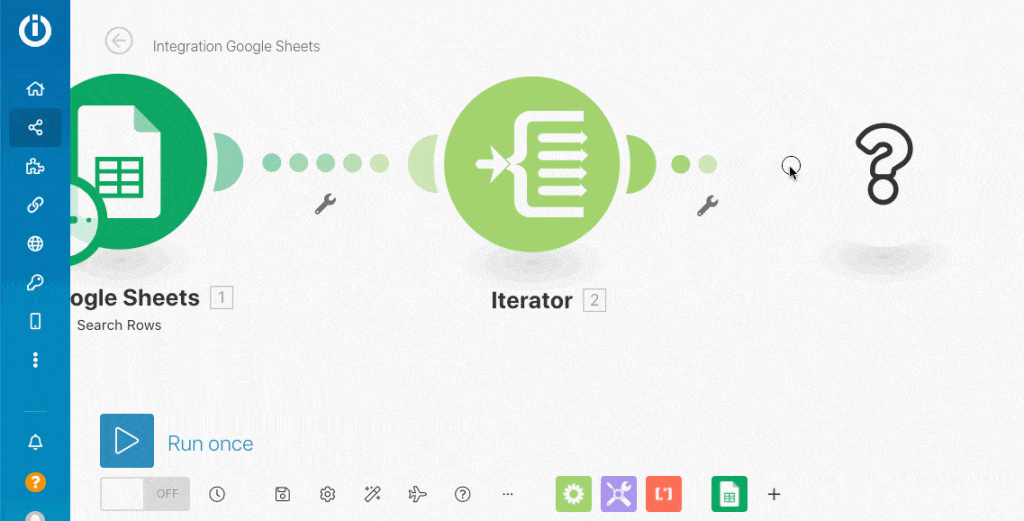
Step 4: Add Sheet to Scenario
Now we’ve created the new Scenario, we need to add the Google Sheet to it. First search for the Google Sheet module and select continue.
Once we’ve selected continue we’ll be taken to the automation flow diagram, where we can set the specific of the Google Sheet module.
In this case we want to select the Search Rows module, to find new rows of prospect data to send emails to…
Once you have added the Search Rows Google Sheet module, you can then connect to your Google account, and your Sheets will be available to select from the drop down.
Finally we can set the Filter for which rows are going to be returned.
We need to set two filters.
- Send Date – Does not Exist: this will ensure we’re only pulling rows of prospect data who have not yet had an email sent to them.
- Campaign Skip – Does not Exist: this will ensure any prospects flagged as skip in the Sheet will be ignored.
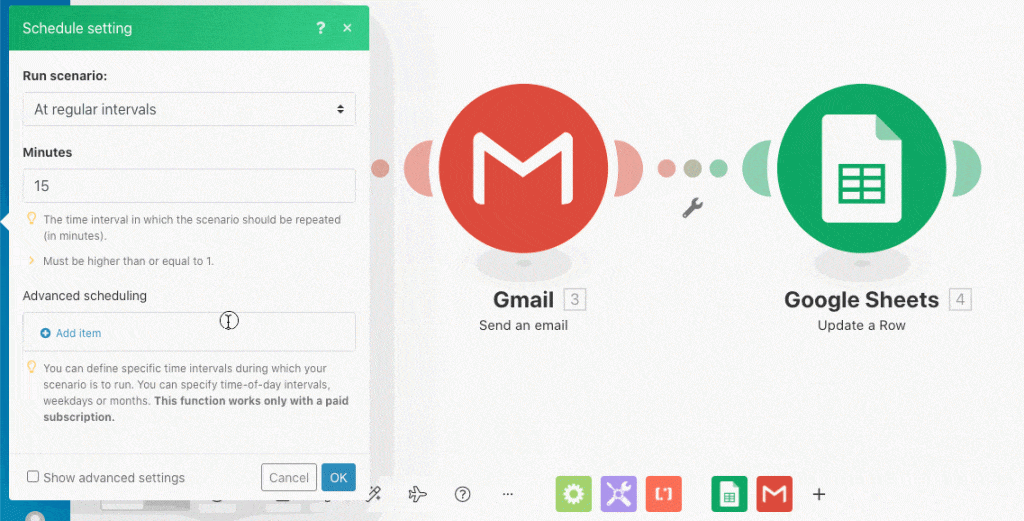
Finally we can set the number of rows to return, this will be how many emails you want to send per each Scenario process.
This number will depend on your email list size. Once the Scenario is complete we can set a scheduler to run every X mins per hour, or every X hours per day, even limiting to set hour schedules.
A good email practice is to spread out your delivery, so for example; send 10 emails every 15mins, between 9am-5pm, Monday to Friday, would be 1,600 emails per week.
Either adjusting the minute intervals, or the number of emails per minute will determine your total emails processed.
Step 5: Add Email to Scenario
Now we have prospect data flowing from the Google Sheet to integromat automation, we can now connect to the email.
First we need to add an Iterator module, which helps processes the multiple rows of data.
Select the Iterator module from the Settings menu (cog icon), this will automatically attach to your Sheet. Then update the “Array” of the Iterator by selecting the Sheet “Total Number of Bundles” option.
Now click the right tab on the Iterator mobile, to add the email module to the sequence.
Search for Gmail in the add module, select and choose the Send an Email option.
Similar to the Google Sheet module, you now need to connect your Gmail account, that you wish to send the emails from.
Once connected you can draft your email templates subject and content, pulling through any of the personalised data merge tags from the Google Sheet.
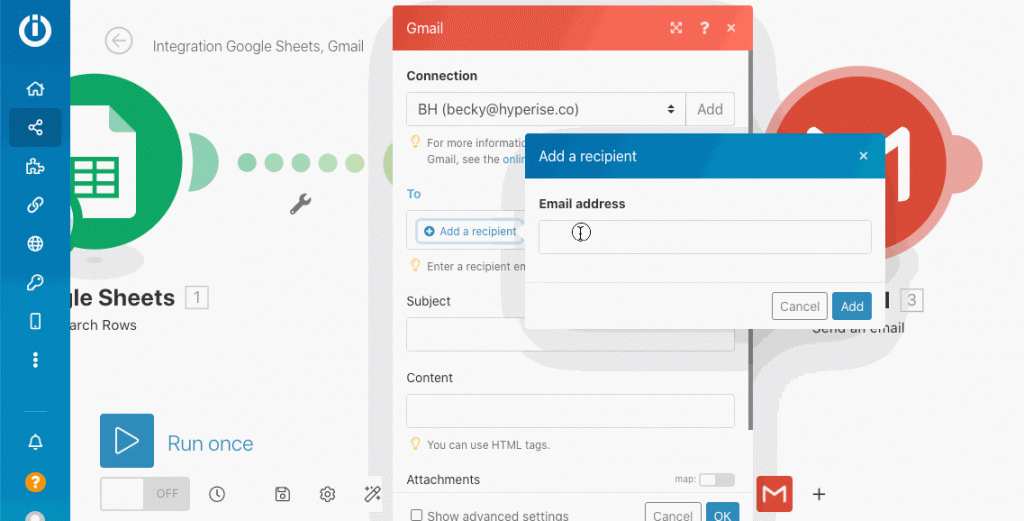
Don’t forget to add your personalised image tag into your email as well! 😀
That’s the email sending part complete! Trust me, it takes longer to read this guide, than it takes to get it done!
Step 6: Create Tracking Scenario
Now the emails are ready to be sent, we need to switch our attention to tracking. In this guide we’re going to be covering two basic tracking, when the emails are sent and when they’re opened.
First let’s tackle the straightforward tracking of emails sent.
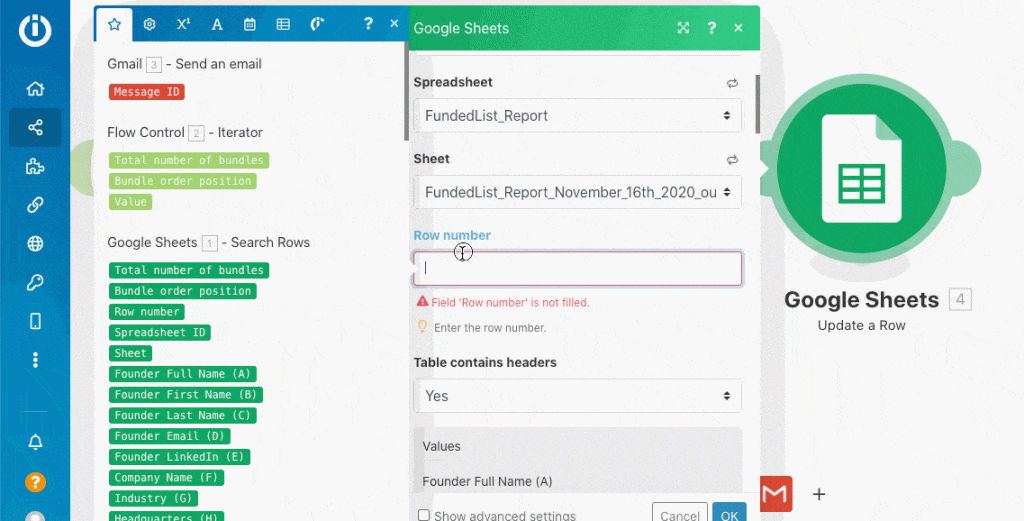
Within the same email send Scenario, we need to add one final module to update the same Sheet we’re sending from.
To do this, click the right tab in the Gmail module, and select the Sheets module and the Update a Row option.
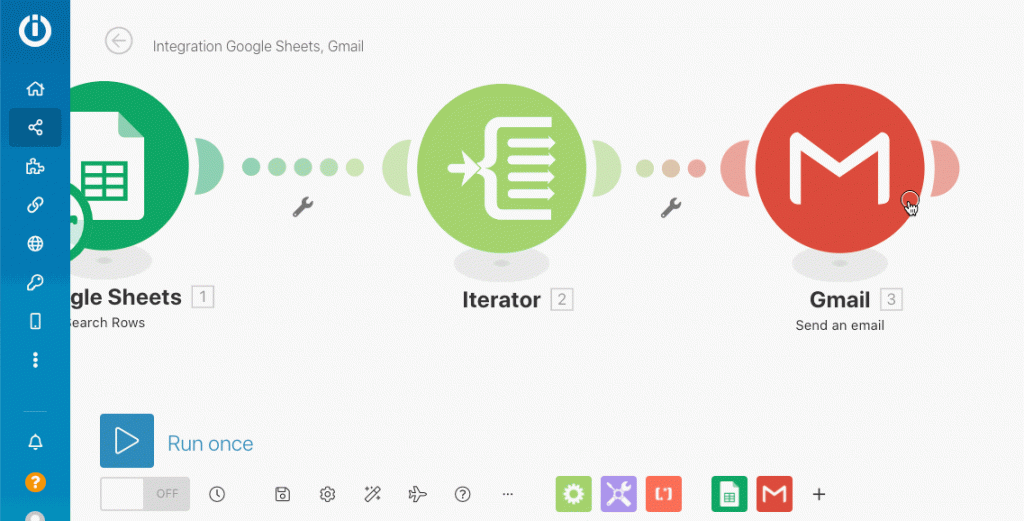
From here you can select the same Sheet, as you did in the first Sheet module, but now updating the Sheet, with the current date in the Send Date column.
Add the row number that’s being updated, this will come directly from the first Sheet module, then add a NOW date formula to the Send Date column.
That’s the first Scenario completed!
We just need to set the schedule, save and turn it on.
Congratulations, you’ve just built your first email automation Scenario!
Overview
Following the above 6 steps and you’ve created yourself the most flexible, cost effective email automation solution ever!
Once you’ve built your first Scenario, you can duplicate and repurpose for other campaigns or colleagues in half the time, and it becomes a really efficient process.
Using the Sheet as your prospect hub, you can daisy chain campaigns and automations, as events and values are updated in the Sheets from other processes and actions.
Next Steps
Once you’ve mastered the above steps…
To go further, we can use this same Sheet filter and update process, but in reverse. So when an email is opened and the Hyperise image is viewed, an integromat process can be triggered to update the sheet.
Hyperise has its own Integromat module, so you can simply select your image template being used as the trigger and then search the Google Sheet by email, or other data passed to the image.

For further details on using the Hyperise Integromat module, checkout this full guide:
https://support.hyperise.com/workflow-automation/integromat-integration
In addition to tracking opens, the same philosophy can be applied to website visit tracking from emails, using personalised images on your landing pages.
You can go further still by automating a sequence of emails, using the number of opens and last open date as filters to select the 2nd, 3rd etc emails to be sent in the same process as above.
Simply clone the first Scenario we created, changing the filter on the Sheet, and obviously the email copy for your subsequent emails.
Last Updated on April 12, 2022 by Ian Naylor